DE
DE





Some of the new features of HAM OFFICE in detail
New color layouts
(QSO input window and simple input window)
All colors can be changed individually via the program options as well as via the options window of the QSO input.
)
(QSO input window and simple input window)
The background color can be changed using the program options.
)
)
(QSO input window and simple input window)
The background color can be changed using the program options.
)
)
)
Basic layouts in the QSO input
)
Each of the 3 basic layouts can be set completely separately. Various presettings were already made during installation.
For example, the window layout for radio operation can be designed completely differently than for the subsequent QSO entry.
The differences are most obvious in relation to the basic layout "Contest/Expedition".
1. Switch on the XPress layout via the menu.
2. If you have already logged a contest with it, the program asks whether this contest should be resumed or whether a new contest should be created. In the latter case, enter a name for the new contest.
3. A settings window now opens. Here you indicate in which order which RST values are queried in the contest. That is in the rules of the contest. (e.g. serial number and DOK)
4. At the bottom of this window you can check the fields that are not required.
5. The option "Entries are only made in the RST field" means that all entries for the contest that concern RST are only entered in this one field. This makes the actual input faster later. But you do without the program automatically entering a value. If this option is not activated, then e.g. the locator is entered in the "real" locator field. That means, however, that you have to press the ENTER key once more.
6. The menu item "Fields" on the left can be used to enter default values for some fields. This is useful if you only want to "climb through" it afterwards.
7. With OK you come to the QSO input mask and can enter QSOs here.
8. The upper switches "F7: Mode " and "F8: Band" are used for quick switching during the contest.
9. With the upper switch "Contest/Exp" you can change the settings from 3. to 6., print or export the ContestLog.
10. After the contest is over, all QSOs are automatically in the current main log. If you don't want that, you should first create a new logbook in the program.
11. The next time you start the QSO input, you will automatically return to the "XPress" basic layout. If you negate the question whether you want to continue the last contest or create a new contest, then you automatically come to the "radio operation" standard basic layout.
The chat function "HAM to HAM "
)
)
The options in the left window relate to this as well as to the display window of the chat function.
In the settings window you can determine whether you want to be visible to other users in the OnAir list. The second option is valid until the program is closed; all other options are saved permanently.
If you have set whether you want to be visible at the top left, you can specify below that this should only apply to the stations that you have entered as "friends" in the list on the right. Then you are "invisible" to everyone else.
You can also set that you only want to receive messages from "friends". All other messages do not arrive.
Messages can generally not be sent to several stations at the same time.
CW-Keyer call and settings
)
)
- Text setting: Here you select which of the 3 text groups you want to use for CW operation.
- Speed: With "Extras - Program options - CW-Keyer" you can specify which speed should be set. Here you can specify the speed that you want to use for the current CW operation.
- Send continuous wave: If this option is activated, the CW keyer sends a continuous tone.
- RST ...: The characters in the given RST (e.g. 599) are replaced
- CtrlNr ...: The characters in the second RST part (e.g. serial no.) are replaced
- Operating characters without space: The letters of the operating characters listed here are sent together without a pause
- After entering the calle ...: When the last RSTs value has been entered, the text provided for this is automatically sent (see texts below). If the contest or the input mask is set so that no RSTs are entered manually, the text will be sent immediately after the call has been entered. The function is switched on here.
- When saving ...: A text can also be specified for the texts, which is sent as a QSO conclusion when saving. The function is switched on here.
- Texts that are entered via the input window ...: If this option is activated, every text that is entered via the input window is sent immediately after entering a letter (see also texts below)
)
- The input field short name contains a short description of the key that is displayed on the F switch.
- Sent text: Depending on what you want to send, you can edit the text here.
- Input window: If this option is activated, an input window appears when you press the F key, which is either empty or contains the text entered here. Pressing the OK button sends the text of this window. The text can be changed. If the Texts via input window ... option is checked in the General tab, then each letter is sent immediately when it is entered.
- Remember: If this option is activated, the program remembers the text last entered in the input window until the end of the program.
- Text to be sent after entering Call ...: This determines which text is to be sent automatically. For this to happen, the corresponding option in the general tab must also be activated.
- Text to be sent when saving ...: This determines which text should be sent automatically. For this to happen, the corresponding option in the general tab must also be activated.
- Reset: The basic text settings of HAM OFFICE are entered.
CW-Keyer device setup
)
PTT
Direct keying of the keyer socket of the TRX. A small interface circuit is set between PC and TRX, which brings the signal states at the PC output (serial port) to the level for the keyer socket. In HAM OFFICE you have to specify which control line is to be used for sending (PTT) and which is to be used for keying. HAM OFFICE then directly generates the telegraphic characters by setting the signal states.
This is the easiest and most common way of CW output via PC. The port and TRX addressed here can be identical to that of the CAT control. In this case, however, the handshake for RTS and/or DTR may have to be switched off for the CAT interface (advanced settings).
Select the COM port with which the connection between the PC and the interface is established. The line specification also depends on the interface.
CAT
The TRX itself generates the telegraphic characters. Since the character buffer is limited, longer CW texts are sent in individual blocks. This can lead to delays.
Various TRX have no control commands to send Morse code. With devices from ICOM and YAESU, the function for sending Morse code via special CAT commands is generally not available. (The query of frequency and mode via CAT also works there. So you can set ICOM and YAESU for normal CAT functions in the program options for the CAT interface.).
The same TRX can be used that is used to query the frequency and mode. Another TRX can also be connected via another serial port.
Select which TRX should be used or select the COM port for another TRX.
WinKeyer or compatible
An interface is switched between the PC and TRX, which sends the text characters supplied by HAM OFFICE as telegraph characters to the TRX. Often a Morse code key can also be connected to the interface, so that CW is given alternately manually or via the PC. The interface must understand the Winkeyer instruction set. This hardware generation of the telegraphic characters brings the cleanest CW tones as there are no software-related delays.
HAM OFFICE is connected to the interface via a real or a virtual serial interface. The serial port must not be identical to the port for CAT communication.
Select the COM port via which the PC and the WinKeyer are connected to one another.
Sound card
CW output directly via the sound card of the PC. The speaker output of the PC can be connected to the TRX via an interface.
This type of CW keyer can deliver unclean signals and is therefore not favored. With this setting, however, you can check the characters sent via loudspeakers very well.
The Multimediabrowser
)
)
)
You can enter web addresses in the list above, which can then be called up with the small favorites button under the web browser.
Basically, it is sufficient to enter a complete address here (e.g. http://www.facebook.com). Since these addresses are often very long, however, you can enter any term after the address in square brackets, which will appear in the favorites menu instead of the long address. For example, if you enter http://www.facebook.com/video/index.html[Sports], then only "Sports" is displayed in the favorites menu.
The Alt key
With the Alt key or via the View menu of the options, the window dividers can now be shown more clearly with a large arrow symbol. To change the dimensions of the window, click with the mouse on this arrow area and then drag it in the desired direction.
The letters with which you can jump to certain input fields directly are highlighted via the menu or with the Alt key. To end this highlighting, press the Alt key or the menu entry again.
)
Add new modes
New modes can now easily be entered directly into the mode table of the QSO input.
)
Here you can add the mode, delete another mode or change the order in the table.
The program also asks for a mode group for the new modes. Generally it doesn't matter, but in the statistics you can list the QSOs according to individual modes as well as according to mode groups. Mode groups usually make more sense, because for many awards it is not important whether USB or LSB were the mode, but whether it was a PHONE or SSB. This is why the statistics can combine different individual modes into a common mode group.
DXCluster - HOCloud
)
)
DXCluster - Band switches
)
In the DXCluster setup, "Display Band/Mode" can be used to set the bands for which only messages should appear in the DXCluster. If you don't want to see the 6m band there, for example, the corresponding band switch is not even displayed.
So now the following possibility arises: In general I am interested in e.g. the 20m and 40m bands, but no others. Then I turn off all other bands in the DXCluster setup. Now only the band switches 20m and 40m are visible. I can now use these switches to only display messages from the 20m band or only messages from the 40m band.
DXCluster Exclusions
)
)
CALL:
Only messages in which the callsign begins with the term (e.g. CALL: D) are excluded DECALL:
Only messages in which the sending callsign begins with the term (e.g. DECALL: D) are excluded DXCC:
Only messages are excluded for which the DXCC of the station is exactly like the term (e.g. DXCC: DL)
DEDXCC:
Only messages are excluded for which the DXCC of the sending station is the same as the term (e.g. DEDXCC: DL)
DXCluster - VIP Alert
)
)
automatic EQSL export
Functions after export
So you don't even have to know where this file is really located.
When exporting, you can also specify which website is to be opened in order to upload the file there.
)
HotImport folder
But there is also an easier way: There is now a "HotImport" folder for imports. Files that you drag in here with the mouse are automatically imported by HAM Office. Once you determine which import settings should apply to this folder and then these will always be used. The HAM Office HotImport folder is best placed on the desktop.
)
External logs, digital programs
You can read in these ADIF files in the conventional way using the import function of HAM OFFICE. A newer, much more direct way is the "External Logs" function:
Here the ADIF file of the external program is queried every second and the QSOs are taken from this file.
Two settings are necessary for this:
1. The name of the log file is entered in the program options under "External logs". Up to 3 logbooks can be monitored at the same time. (You can find help for the information in this window a little further down this page.)
)
)
HAM OFFICE reads the file from back to front. As soon as HAM OFFICE encounters a QSO that is already in the HAM OFFICE log, HAM OFFICE stops reading. If the last QSO has already been entered in the program, no further QSOs will be fetched from the file.
HAM OFFICE requires a uniform spelling of the line end characters "eor" in the file. These should either always be capitalized (EOR) or always lowercase (eor).
If the option "Show last imported QSO in QSO input fields" is activated, then the QSO imported from the external file is not only entered in the QSO list, but also in the input fields above. Here you can now make additions and save them.
)
The edim files from MSHV can also be read.
WSJT-X: c:\users\...\AppData\Local\WSJT-X\wsjtx_log.adi
or c:\Users\...\Application Data\Local\WSJT-X\wsjtx_log.adi
HDR: C:\Users\...\AppData\Roaming\HRDLLC\HRD Logbook\My Logbook backup 2020-04-06 1338.xml
or C:\Users\...\Application Data\Roaming\HRDLLC\HRD Logbook\My Logbook backup 2020-04-06 1338.xml (the numbers in this name change from day to day, HAM OFFICE doesn't care) < br> MixW: C:\Users\...\AppData\Roaming\MixW\MixW2.log
or C:\Users\...\Application Data\Roaming\MixW\MixW2.log
Sometimes the file extensions or the entire folder are not visible. In this case, check the following in Windows:
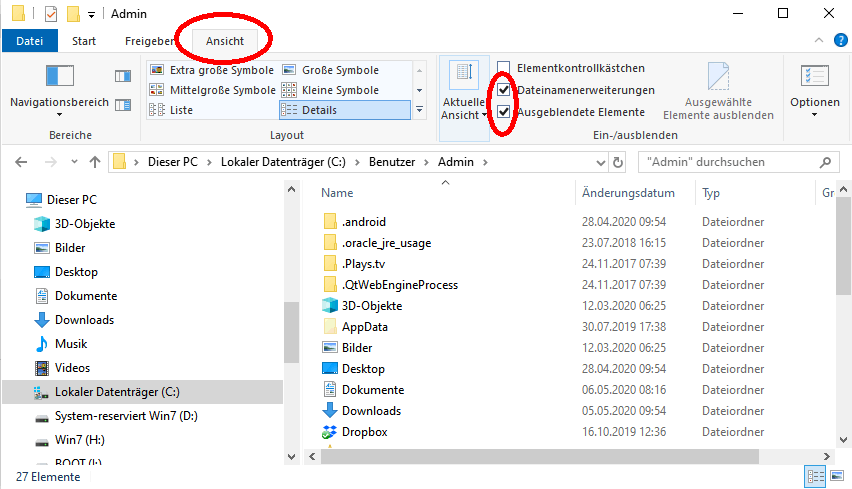
Also in the browse window, make sure that you make the right selection at the bottom right:

)
CQ monitoring from WSJT-X
First you should activate this function in the program options (see image below option "WSJT-X"). The UDP port must also be activated in the WSJT-X program. The UDP server address and the UDP port should match for both programs.
)
In the switch bar you will find a switch to temporarily switch the WSJT-X off and on. When the connection is established, the switch lights up green.
)
Top alarm function in the DX alarm window
One possibility is to always switch back and forth between the two programs.
Another possibility is to put both programs next to each other and to reduce the QSO input window of HAM OFFICE as well as the window of the other program so that they fit next to each other. The third possibility is the top alarm function: If you press the button "Top-Alarm", the QSO input window is reduced and only the QSO list, DX alarm and statistics are displayed. Between these window parts there are bars for moving the size of the window parts. Another option under the statistics subwindow determines whether the 3 subwindows are arranged horizontally or vertically.
)
Track beacons
You can either track all the beacons one after the other or you can choose a specific beacon from the beacon list above.
Then press the "Start" switch so that the TRX can always switch to the frequency of the currently audible beacon in good time.
Now you can use the colorful switches below to indicate when the beacon can be heard well. This is also immediately colored in the world map.
In the end result you can see on the map where the reception conditions are currently good and where they are not.
This function is reached via the main menu "Extras - Track beacons".
)
Web optimization
Depending on which web databases are queried, HAM OFFICE now uses a cache function which minimizes the accesses to these web databases. This accelerates the query of name, QTH and locator considerably. In addition, the Limit that some web databases have set up for free use can no longer or only very rarely be reached. So you also save money.
In the above window you can see top right how many direct accesses to the web database took place during the day to see the website for every QSO, e.g. at qrz.com, but only for the determination of name, QTH, locator and QSL info.
In the QSO input window there is now a in addition to the OV name Display of the QSL info of the remote station. To do this, the option "Determine name and QTH" must be activated for qrz.com.
)
Synchronize
In the selection window you decide which files should be fetched from the second HAM OFFICE into the current program.
)
It is important that communication in data protection (APP and other HAM OFFICE) is enabled.
When the function is started, HAM OFFICE automatically creates an AutoBackup of the files so that the old state can be restored if necessary.
Web QSO exchanges
)
- Export: Send QSOs from the HAM OFFICE logbook to the web (upload)
- Import: Read QSOs from the web into HAM OFFICE or compare them with the logbook (download)
- Photos: Load eQSL images and OP/QSL photos from the web or provide your own photos to HAM OFFICE users.
- List of QSOs in the various web databases, eQSL-Inbox
Here you choose which database on the web the QSOs should be sent to. If you check several databases, the QSOs will be sent to these databases in one go. After clicking on the small plus sign next to the database logo, you can make various settings for the export.
)
This window contains two different functions. Using the button above you can import QSOs from the HAM OFFICE online log into the program. This is useful if you have entered QSOs directly in the online log or if you want to fill an empty logbook with the online QSOs.
The two functions concern the comparison with EQSL or LotW. Tick one or both databases and start the import. The program then compares the QSOs at EQSL or LotW with those in the program and sets QSL rcvd. Import settings can be changed by clicking on the small plus symbol.
Here you determine from which database QSL images are to be loaded. These will be displayed later in the program when entering the QSO.
After clicking on the small plus symbol, the settings for loading the photos can be changed.
This function takes you quickly to the QSO lists of the relevant websites. HAM OFFICE logs in there automatically and displays the correct page.
)
All functions can take place automatically when the program starts or ends (every time, weekly or monthly). If you click on the small cross next to the database symbol, you get to the settings window for the corresponding function
If you have set the automatic mode, the window shown above will appear at the start or end of the program, showing the process of the function.
)
The active databases are shown at the top of each window. Databases for which you have not yet entered any login data are listed in gray under the active databases. If you click on the gray logo, you can activate it.
RX on air
The function is called up via the small "RX on air" button in the lower right corner of the program's start screen.
)
The image file shown below is called:
"https://www.hamoffice.de/myLog.htm?call=XXXXX_freq.png" (XXXXX = your callsign)
)
This image file is called:
"https://www.hamoffice.de/myLog.htm?call=XXXXX.png" (XXXXX = your callsign)
Note: So that the QSO list is also displayed, HAM OFFICE must go to " Logbook - OnlineLog, eQSL, Lotw, etc - Export" the OnlineLog function must be switched on.
)
This list can also be completely inserted on another website. This is described in the video.
If you don't insert the list but call it up directly, the Link
is called "https://www.hamoffice.de/myLog.htm?call=XXXXX" (XXXXX = your callsign)
Note: So that the QSO list is also displayed, the OnlineLog function must be switched on in HAM OFFICE for "Logbook - OnlineLog, eQSL, Lotw, etc - Export".
)
Procedure
HAM OFFICE determines the frequency as follows: If the CAT query of the TRX is switched on, HAM OFFICE reports the frequency set there. If no CAT is switched on, HAM OFFICE checks the QSOs that are currently being taken over from a digital program or an ADIF file, for example, and sends this frequency. If a QSO is currently being made in the QSO input window or in the contest, the frequency of this QSO will be sent. Alternatively, you have the option of entering the frequency and mode manually so that these values are displayed. An information text can also be sent, which then appears in the RX status screen.Setting options
This function can be switched on and off using the "RX on air" switch. You can also use it to switch the CAT query of the TRX on and off.In the settings you can determine whether the "RX on air" function and the CAT query are started automatically when the program starts. HAM OFFICE users who often have a digital program running at the same time on the same COM port as HAM OFFICE should note when automatically activating the CAT function that only one program can access this COM port at a time. The last started program can then not access the TRX. As described above, HAM OFFICE still gets the current TRX frequency from the incoming digital QSOs.
If you specify in the settings that "RX off air" is not displayed after the program has ended, then only a reference to the function appears in the image file.
The RX image can also be used to display important information. You go to the RX on air switch in the start window and click on the menu item "Send RX info text manually". Depending on the setting, this info text can always be displayed in this screen or only as long as HAM OFFICE is open.
)
The image below shows two variants of the RX on air image when HAM OFFICE is switched off. If you have activated the option "show off air message", the upper of the two images is shown with the red circle. Otherwise a neutral image with the HAM OFFICE logo will appear.
)
EQSLPhoto box
)
Another possibility is to enter a callsign in the QSO input window. If there is an EQSL image for this callsign, this can be displayed by clicking on the small qsl button. This display window has a link to the EQS photo box at the bottom.
Third possibilty: Button "QSL" on toolbar of home screen (see picture)
)
In order for images to be made available in the EQSLFoto-Box, a checkmark must be set in the above-mentioned window for "eQSL - plus sign - settings" in the option "Provide images for EQSLPhoto-Box".
)
The EQSL photo box window overlays the QSO input window. Nevertheless, the QSO input window can be operated and values can be entered in the fields.
The recently downloaded images are in the "Inbox". If you click on the left arrow switch, the previous or the next image from the input folder is called up. At the same time the entire QSO input window is updated: In the QSO list, all QSOs with the remote station appear from the picture. If HAM OFFICE has found the QSO from the picture, then the data of this QSO will be entered in the input fields above.
Now you can add certain information from the QSL image in the QSO window.
Once this is done, you press the green switch so that the QSL image is moved from the "incoming batch" to the archive .
)
- Zoom switch plus and minus: Enlargement of the QSL image, the image is then moved using the scroll bars on the right and below the image
- Switch with 3 points: open or close extended setting options
- Sorting according to which the next picture is found
- View - Map: the QSL image is displayed
- View - List: all images from the folder are displayed. There are boxes in front of the image names. If this is checked, all of these images are moved to the archive or to the filing system in one go
- Period: Here you can specify whether only certain or all images from the input folder are to be displayed
- Select all: The list appears with all images that are then checked.
- Archive: The current picture or all checked pictures are moved to the archive folder.
- Storage: The current picture or all checked pictures are moved to the storage folder.
- Open folder: opens the current folder in Windows Explorer.
- In the search field you can enter callsign, date, band or mode to determine the displayed QSOs.
)